Prerequisites:
- MySQL Database
- Glassfish 5 – 4.1.1 won’t work for this guide
- Java 8 SE
- Java 8 EE SDK
1. Download JDBC driver
At the moment of writing, the latest version (8.0.15) of the JDBC driver does not work with Glassfish. Use 5.1.47 instead.
For the lazy, go to your glassfish domain folder
\glassfish\domains\domain1\lib\
and run the following:
wget https://dev.mysql.com/get/Downloads/Connector-J/mysql-connector-java-5.1.47.zip

jar xf mysql-connector-java-5.1.47.zip

move mysql-connector-java-5.1.47\mysql-connector-java-5.1.47.jar .
2. Set up JDBC Connection Pool
Glassfish Admin Console:
Resources > JDBC > JDBC Connection Pools > New
Configure as follows:
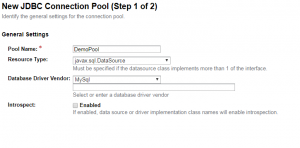
Pool Settings and Transaction is up to you
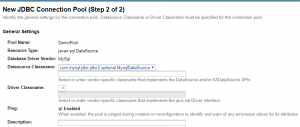
In Properties, the following are required:
User: {your db user}

Password: {your db user password}

URL: jdbc:mysql://{host}:{port}/{database name}

Url: jdbc:mysql://{host}:{port}/{database name}
Click ”Finish”
If everything is set up correctly, you should see this:

3. Set up the JDBC Resource
Glassfish Admin Console:
Resources > JDBC > JDBC Resources > New
Configure as follows:
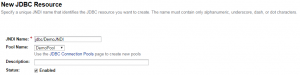
Remember your JNDI Name
Click ”Save”
4. Use the JDBC Resource
Sample code to connect and start querying:
InitialContext ctx = new InitialContext();
DataSource ds = (DataSource) ctx.lookup("jdbc/DemoJNDI");

    conn = (Connection) ds.getConnection();

    try {
        Statement stmt = conn.createStatement();
        ResultSet rs = stmt.executeQuery("SELECT 1");

        rs = stmt.getResultSet();
        while (rs.next()) {
        // Do something with ResultSet
        }
    } finally {
        conn.close();
    }
Done!